How to create a paid newsletter
By Pam Neely September 8, 2022
Paid newsletters are one of the best ways for creators and subject experts to monetize their knowledge, especially right now.
Newsletters have always been an ideal way to build an audience and offer premium content, but in the last few years the idea of paying for newsletter content has become more and more accepted. Creating a paid newsletter has also become a lot easier, as email marketing tools have evolved and paid subscription services have become easier to set up.
You can now create a fully functional, paid newsletter for free in just a few hours. This post will show you how to do it, step by step.
Here’s what you’ll need to get it done. We’ll walk through each step of the process below.
- A topic and an audience for your newsletter
- A name for your newsletter
- A price for your paid newsletter
- A well-defined difference between the free and paid versions of your newsletter
- A free AWeber account
- A Stripe account
- A landing page with sign up forms so people can sign up for both the paid and free versions of your newsletter
That’s it. So let’s get your paid newsletter built so you can start creating.
Step 1. Choose a topic and an audience for your newsletter
You’ve probably got an idea for a newsletter topic already. So the work here is to vet your idea and to get clear about who your newsletter is for.
Topic and audience are different things, but they complement and influence each other. They’re also a key aspect of success. You can pick a good topic, but if you’re writing for everyone, your newsletter might not make your readers feel like “this is perfect for me.” But when you get the topic and your audience aligned, your ideal readers will know they’re home. They’ll be happy to pay for your content.
The ideal paid newsletter topic for you is a topic:
- You could talk about for hours
You’ll need a strong interest in your topic if you’re going to produce a newsletter about it for months (or even years) to come.
- Has at least 20 blogs, websites, newsletters, online forums or Facebook groups dedicated to the topic (or directly related to the topic)
This is to verify that there’s enough of an audience to support your newsletter. - Has at least 20 products or services you could sell via affiliate marketing
This is to verify that you can monetize your newsletter. It’s also another way to verify that there’s an audience for your newsletter, particularly that there’s an audience willing to pay money for information about your topic.
Choosing a topic for a newsletter is not all that different from choosing a topic for an online course, so if you already have a course or an existing audience, you’ll got this first step down.
Step 2. Choose a name for your newsletter.
You could skip this step, but because we’re talking about paid newsletters here — and paid newsletters are basically a product — it helps to have a name. You’d name any product you were about to create, right? So think of a name for your newsletter.
Or ask people.
Or… think up a few names and ask people.
When I created my paid newsletter, I wanted to get the name right. So I mulled it over for a while (okay, weeks), and then created a poll on LinkedIn to see which newsletter name people liked best.
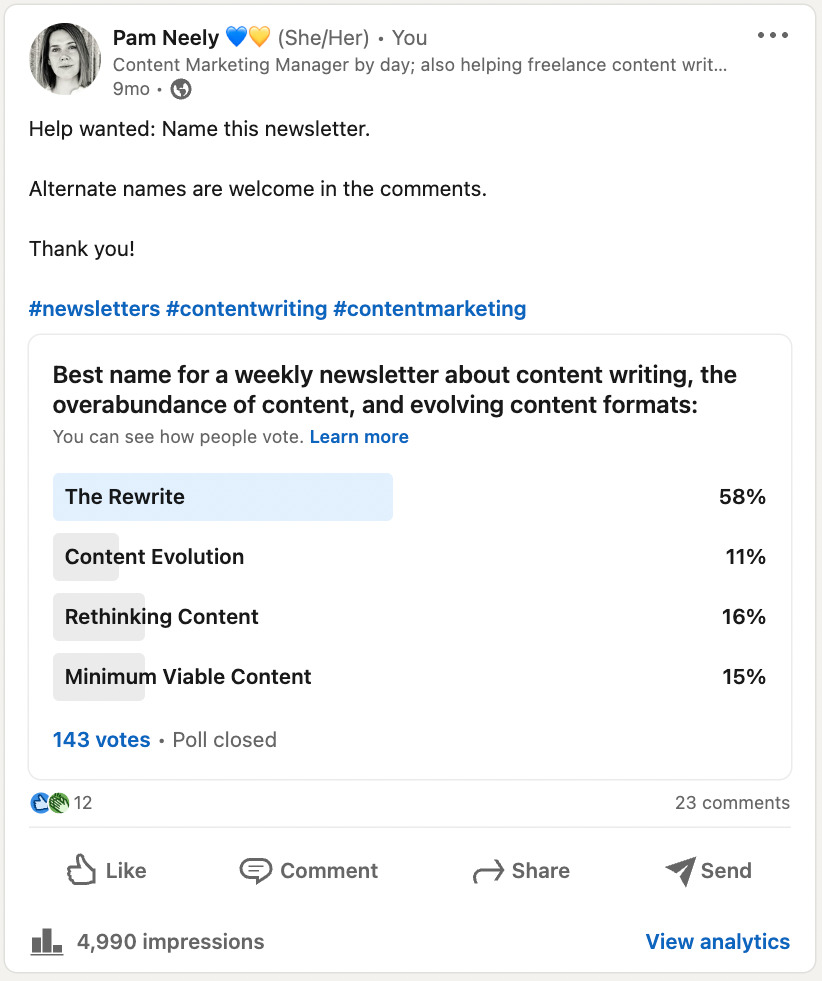
Posting that poll gave me a name I could be confident about, but it also gave me a bunch of feedback about what my audience thought of the topic, and about the “slant” I wanted to put on the topic.
Step 3. Define the difference between your paid and free lists
The free version of your newsletter will still offer a lot of value, of course, but the paid version needs something extra special. Defining the difference between your two newsletters is also a key part of selling your paid newsletter. That’s why this step matters.
Fortunately, adding value can be easier than it looks. And it doesn’t mean you have to provide tons of extra content. In fact, sometimes the value of a paid newsletter is in how it condenses information so people don’t have to spend hours reviewing content just to get actionable insights. There are plenty of paid newsletters that do exactly this. They’re curated summaries of different industries or topics, and people pay for them because the newsletter saves them time.
Another way to distinguish the free and paid versions of your newsletter is to explain the “why” about things in your free newsletter, but save the “how” for your paid newsletter. For example, for a newsletter about being a solo professional, you could talk about why having an expense tracking system is important in your free newsletter, but in your paid newsletter you could provide a link to a video training about how to set up an expenses tracking system step by step.
What will be the key difference between the free and paid newsletters you’re offering? Give this some thought. There’s often a fairly easy way to deliver something quite valuable — and that doesn’t take a lot of work on your part. Knowing your audience will help a lot with this: If you know them well, you’ll know what they’re willing to pay for.
It doesn’t have to be a huge thing, either. Author and podcaster Ann Friedman gives her paid readers a fun hand-drawn pie chart every week:
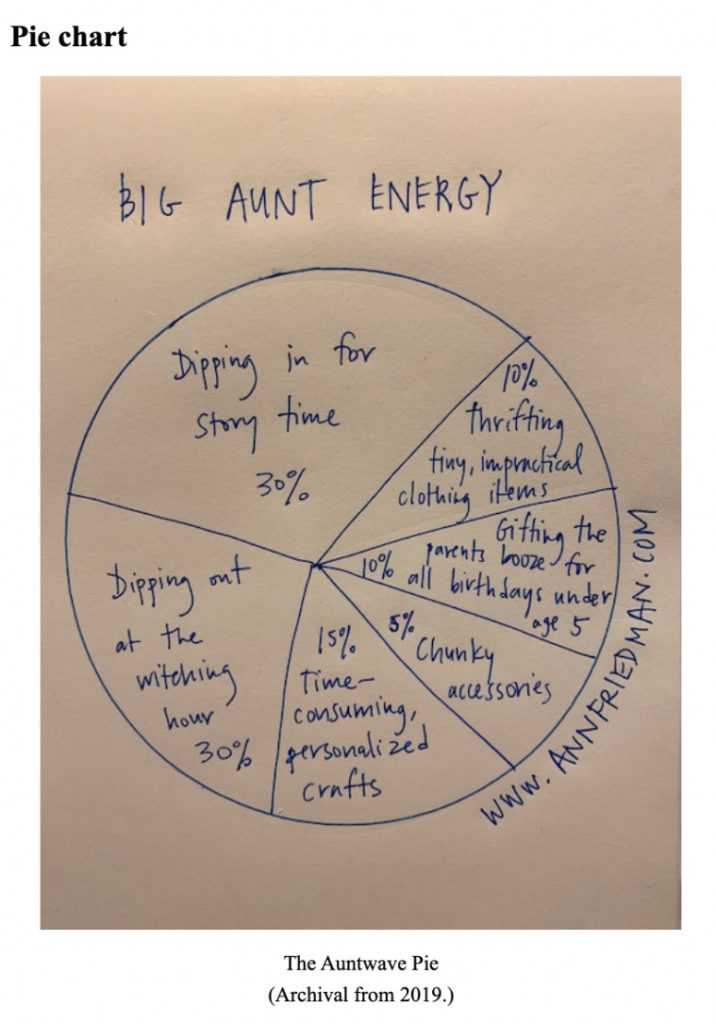
Instead of seeing the pie chart, Ann’s free subscribers see a note that says if they were a paid reader they’d be seeing a fun pie chart, and they’d be supporting her work for a modest annual fee.
For more ideas on what to include in a paid newsletter, see our blog post, Build and monetize your community with Newsletter Hub.
Step 4. Decide on the price of your paid newsletter
Do you see why this step comes right after you’ve defined the difference between your paid and free newsletters? It’s because depending on what you’re offering in your paid newsletter, you might want to charge $3… or $30… or even $300 a month.
That said, most paid newsletters cost about $5 – 15 per month, so you might want to keep your monthly subscription price in that range.
But don’t think just month to month. You can also offer people a way to buy your newsletter by the year.
Here’s how that payment structure might work out:
If you charge $3 per month, you can offer a 50% discount if people buy your newsletter for a full year. So people would pay $36 if they bought your newsletter month to month, but if they buy for a year, it’s only $18. That’s inexpensive enough that buying your newsletter isn’t a big ask — and you won’t have to kill yourself offering super-deluxe content in the paid version.
Just don’t forget to factor in transaction fees. Depending on the newsletter platform you’re using, you can be charged up to 10% of the subscription value just from the newsletter platform. And then you’ll get charged again by Stripe.
We might be partial here, but this is a great reason to use AWeber. Our per-sale fees are one tenth of what other newsletter platforms charge. If you’re on a free AWeber plan, you’ll pay 1% of the value of each sale. If you’re on AWeber Pro, you’ll pay 0.6%. Stripe will charge you an additional 2.9% of each sale plus an additional 30¢ per successful card charge.
At $3 per month, the fees would be:
AWeber Plus fee 0.60% = 1.8 cents
Stripe 2.9% + 30¢ = 8.7 cents + 30 cents = 38.7 cents
40.5 cents per charge.
So you’d end up making only $2.595 per month per paid monthly subscriber.
This is how it would work out for annual subscribers:
AWeber Plus fee 0.60% = 10.8 cents
Stripe 2.9% + 30¢ = 52.2 cents + 30 cents = 82.2
93 cents per charge
So you’d make $17.07 per annual subscriber.
That’s still pretty good. With even 500 paid monthly subscribers, you’d be earning $1,297.50 per month. What’s that — rent money? A mortgage payment? Or a full month’s expenses if you live in Panama.
Step 5. Create a free AWeber account
Okay — so we’ve figured out a lot about your newsletter. Your topic, your audience, the price. Now let’s start actually creating your paid newsletter. Fill out the form on this page to create your free account and you’ll have this step knocked out.
Step 6. Create a list for your newsletter in your AWeber account
AWeber will automatically create a default list in your account, so all you need to do is to rename your list. (Aren’t you glad you named your newsletter?)
To create a list, just click on “List Settings” in the left-hand navigation column of your account.
You’ll see this page next.
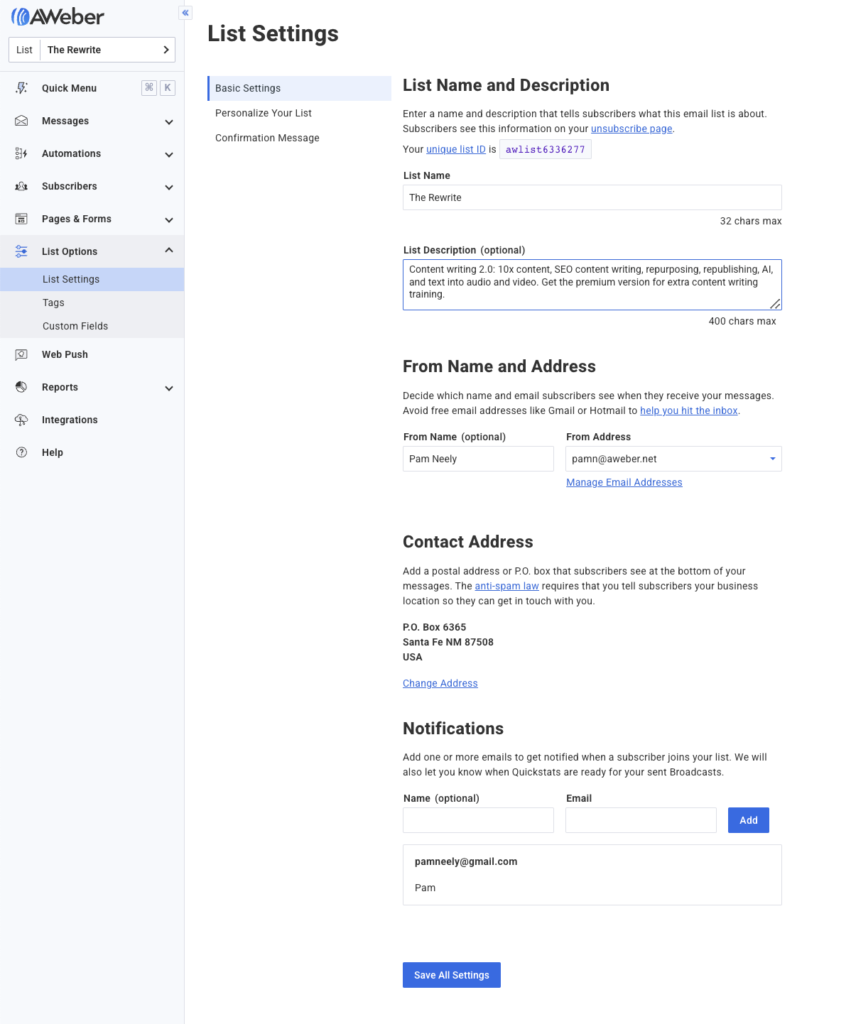
From this page, from the “Basic Settings” tab you can:
- Edit the name of your newsletter’s list
- Add a description of the list
- Specify the name and email address your newsletter will come from
- Edit or set the physical address included at the bottom of your newsletter (required by CANSPAM law)
- Define which email address you want to send new subscriber notifications to
You can also customize a confirmation message from the tab “Confirmation Message.” This is recommended, and you can get ideas for what to include in your confirmation message in this video.
You can create a custom confirmation page (that people will see right after they submit their email on your sign-up form. See how to create a custom confirmation page in this video. Note that you can also personalize your thank you pages with people’s names — if you want to get fancy.
Step 7. Create and connect your Stripe account with AWeber
In order for people to pay for your newsletter, you’ll need to connect Stripe and AWeber.
Creating a Stripe account is free and takes about 20 minutes. Go here to get started.
Connecting a Stripe and an AWeber account takes about five minutes. There are instructions on how to do that here.
Once that’s done, let’s create a landing page so people can sign up for either the free or paid version of your newsletter.
Step 8. Set up a landing page to charge for subscriptions
The first step of this is to create a landing page. This is going to be a bit more complex than the usual sign-up page, because we’re going to have three ways to sign up for our newsletter/s.
– A sign-up form for free subscribers
– A sign-up form for monthly paid subscribers
– A sign-up form for annually paid subscribers
I’m going to start with an ecommerce landing page template. So I’ll go into the landing page templates area of my account (these are included in AWeber’s free plan).
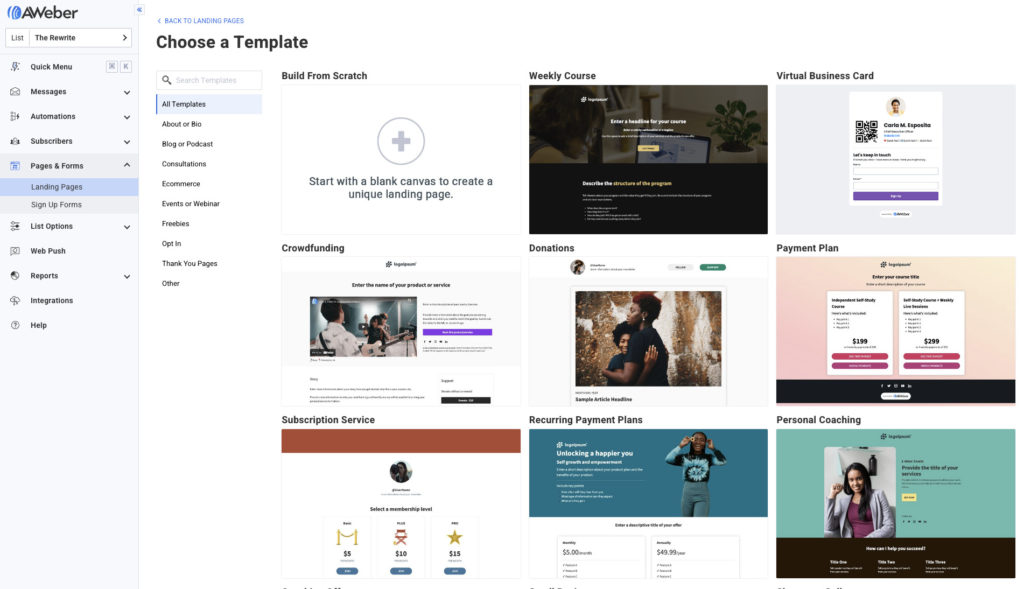
And pick this landing page:

I played around with this landing page for a bit to adapt it to my newsletter. Here’s what I did:
- Edited the copy in the left column
- Changed the background color to the pale blue you see below
- Swapped out the image of the woman for an image I made from UnSplash images
- Added three “rows” — one for each sign up option
- Added a sign-up form to each of the rows, then increased the padding on the right and left sides of each sign-up form
- Added the “ecommerce” buy button below the sign up forms in the two paid options
- Then removed the sign-up forms from the two paid options, because the buy buttons capture people’s names and email addresses when they pay (so no need for those opt-in forms)
That’s a lot of changes. There’s a tutorial on how to work with AWeber landing pages (starting with what a landing page is) if you want to see how to make these sorts of changes. AWeber’s landing page builder is a drag and drop editor, so there’s no coding or special knowledge required. If you start with the template I used, you’ll have an even easier time getting to a the page you want.
Here’s what it looks like after all those changes:
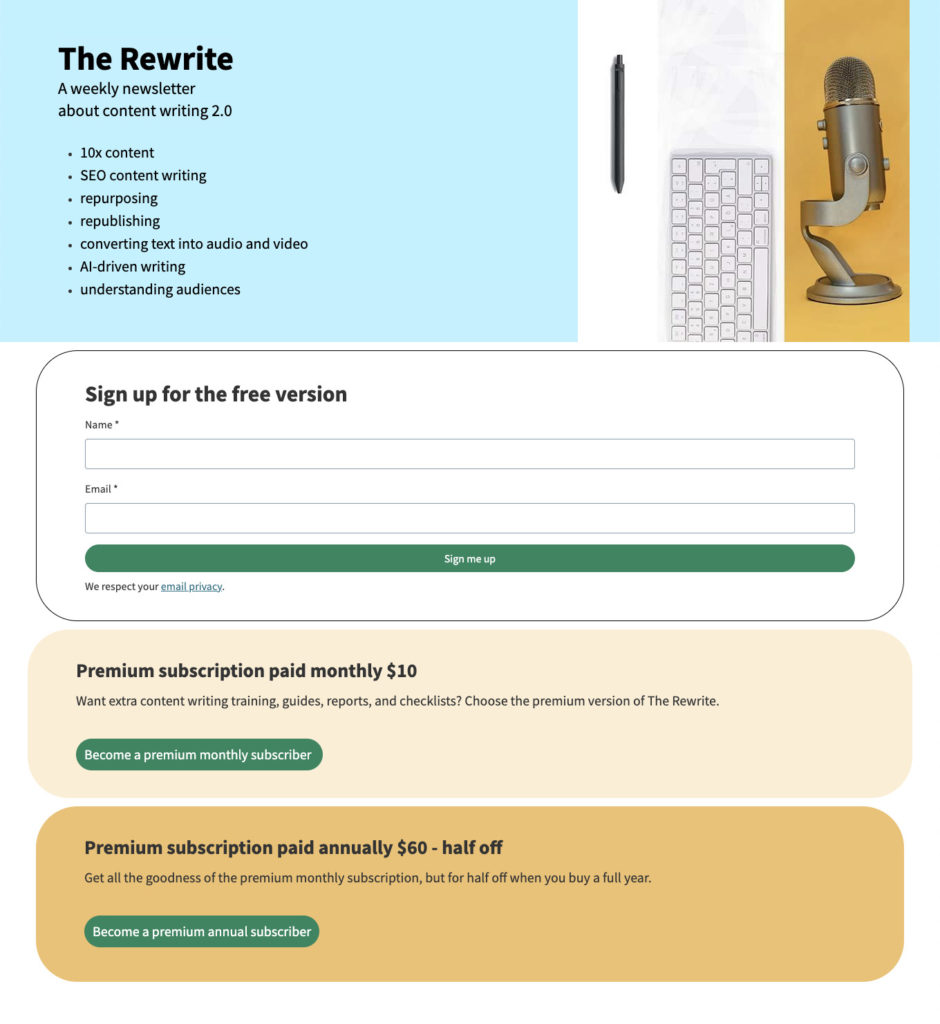
It’s a simple page, but I’m okay with that for right now. Later I will go back and add more description to the paid newsletter blocks to sell the paid versions better. When I get a few testimonials, I’ll add those to the bottom of the page. I’ll probably also add a section that talks in detail about what the newsletter includes, and add links to a few sample issues, just so people can see what they’re getting.
But for right now, this page is good enough to get started with. I don’t want to slow my momentum down by fussing with it too much right now.
Especially because I need to set up those buy buttons.
Step 9. Connect the buy buttons to Stripe products and add the purchase automation tags
Now we’re going to get the buy buttons working, because, well, that’s the point of all this.
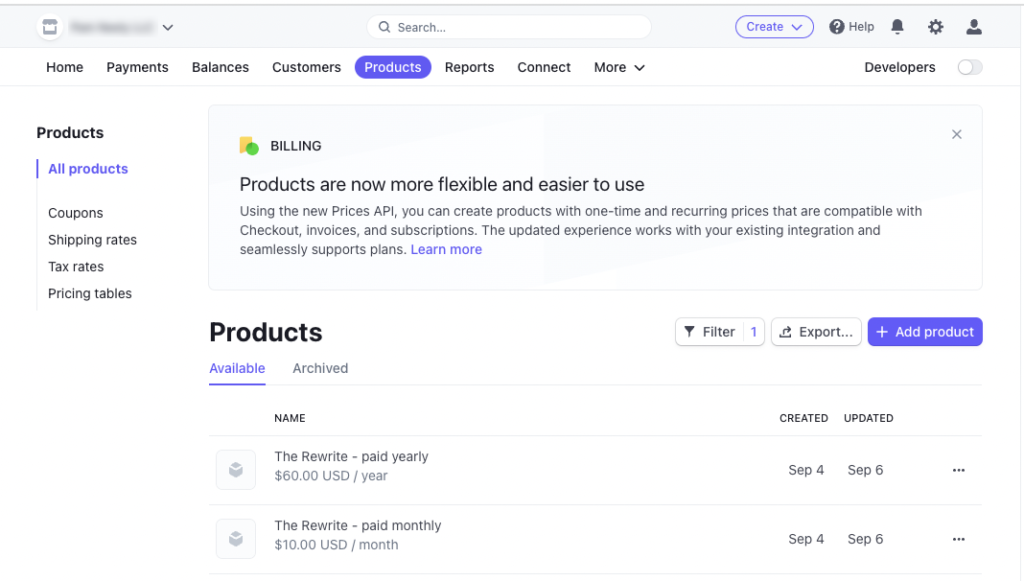
I’ll start by going into my Stripe account and creating two products: One for the recurring monthly payment, and one for the recurring annual payment.
To create the products you go into your Stripe account, choose the “Products” dashboard, and then click the purple “+ Add product” button on the right.
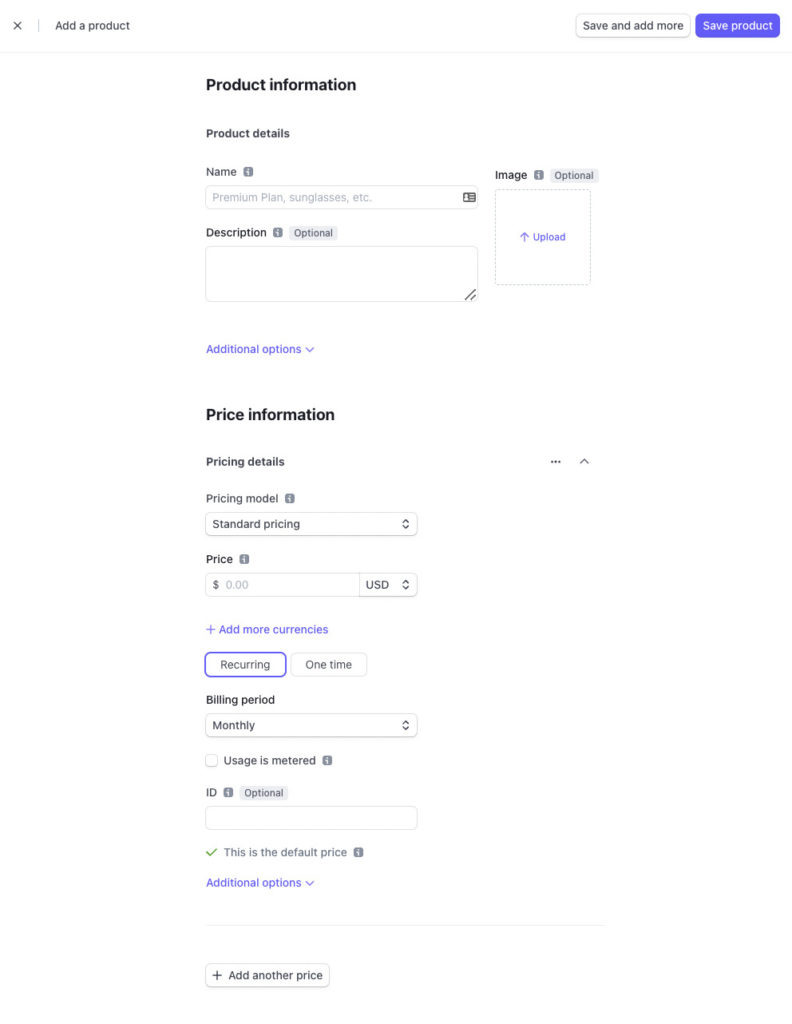
Fill out the basic information on the next page (product name, description, price, etc) and click Save.
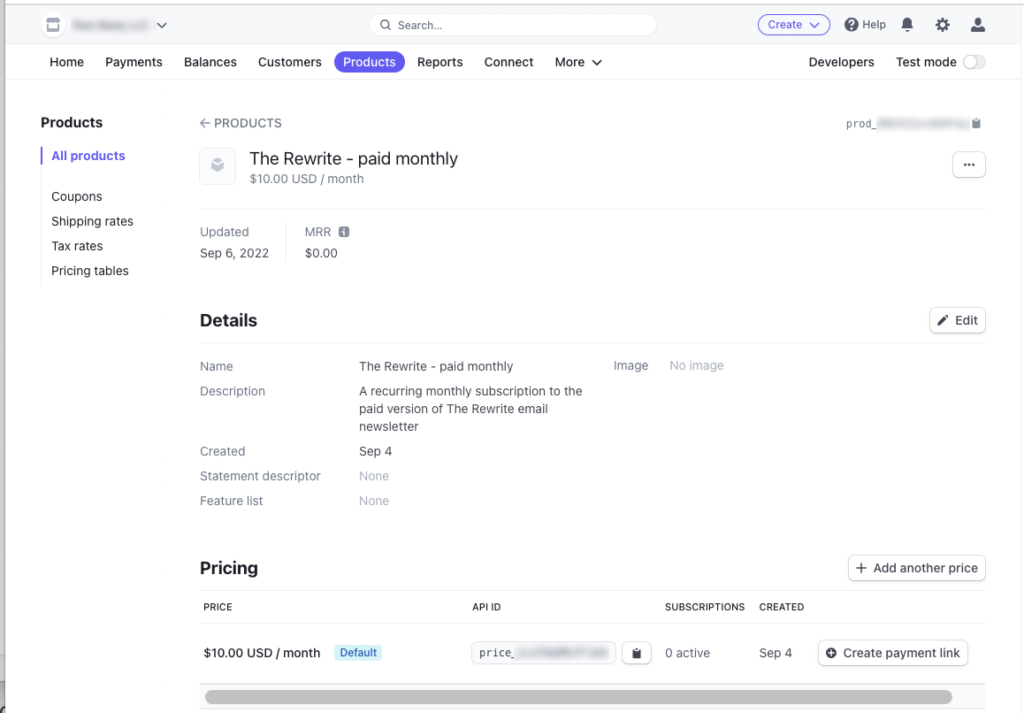
Then click on your product from the product dashboard area. You should see something like this:
Now that those products are created — and I’ve already connected my Stripe account and my AWeber account — it’s a snap to make those buttons on the landing page actually trigger a purchase.
I just click the buy button and choose the product I want it to trigger.
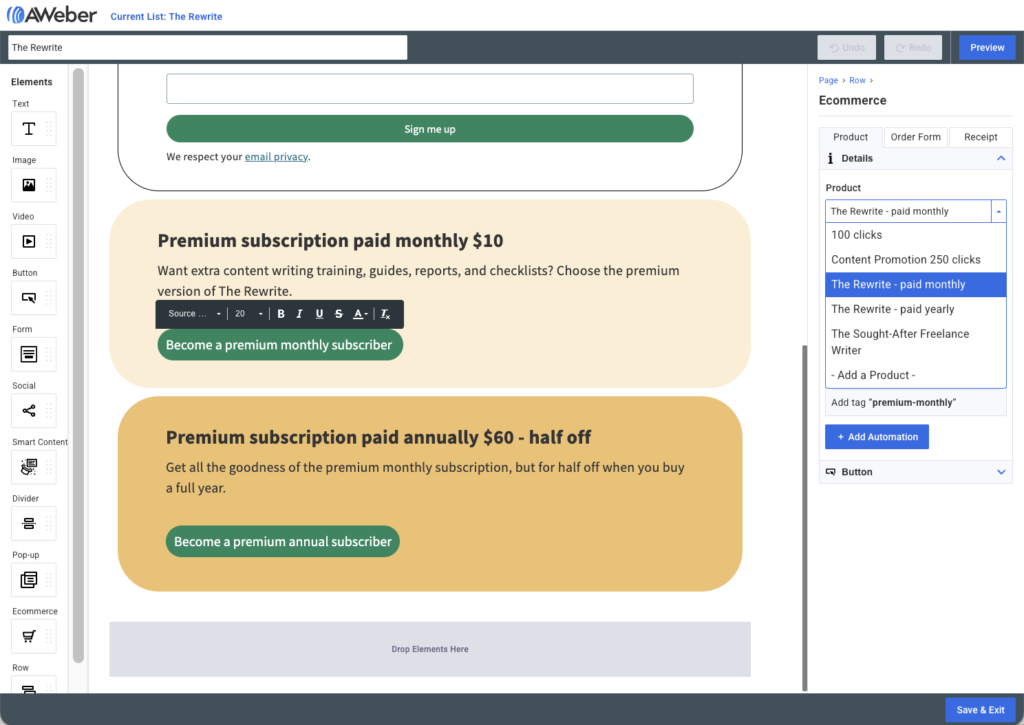
Now you’ll need to add a tag to each button so when people buy the paid newsletter (monthly or annual) they’ll be tagged in a way that tells your AWeber account, “Hey — this is a paid subscriber! Send them the paid version of the newsletter.”
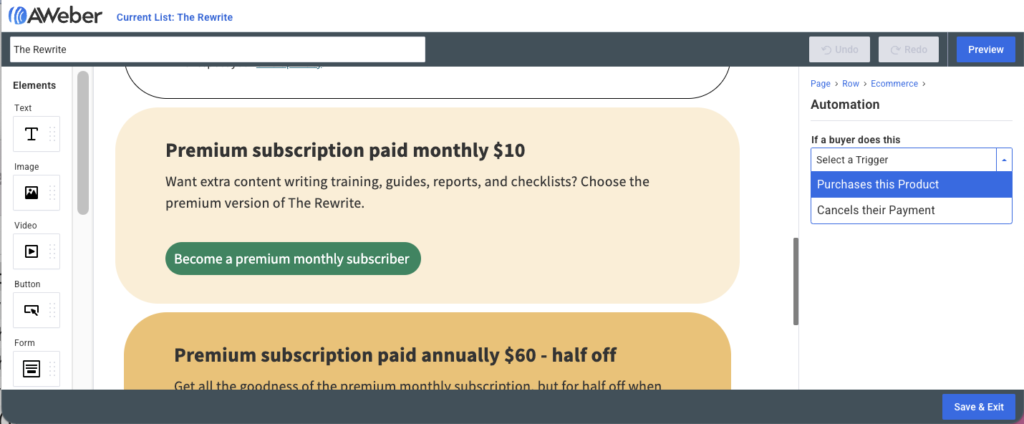
This is also super-easy. You just click the blue “+ Add Automation” button in the right-hand corner (visible in the screenshot above, right below the Stripe product selection pull-down).
Then you select which action you want to trigger the automation (in this case, “Purchases the Product.”)
And then you type in whatever tag you want to use.
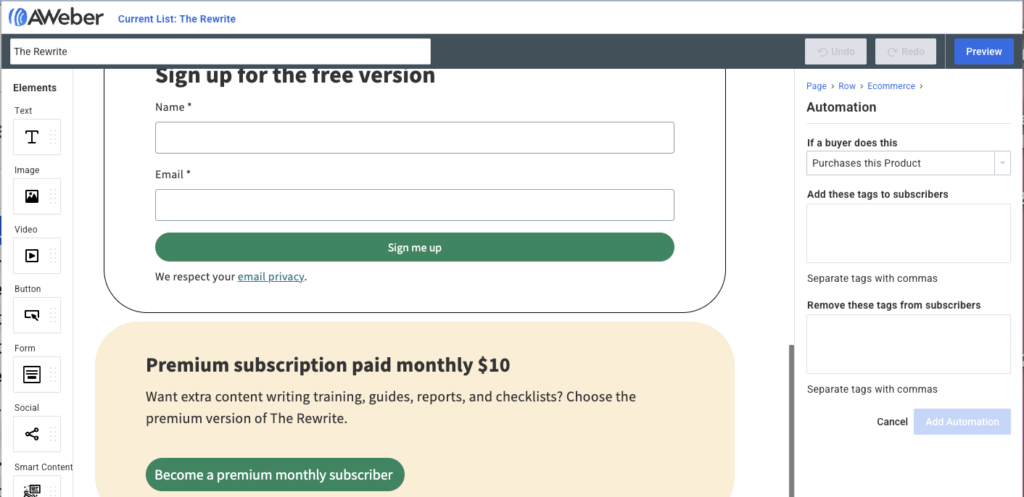
I used the tag name “premium-monthly”. You can use whatever you want.
So now whenever someone buys this “product,” they’ll be tagged with a tag that identifies them as having either a monthly or an annual subscription.
Let’s publish the landing page and see if all this actually works…
It worked!
And — tada: I got an email confirming I subscribed. With the right tag and showing Stripe as the source and everything.

Stripe also shows the payment went through:
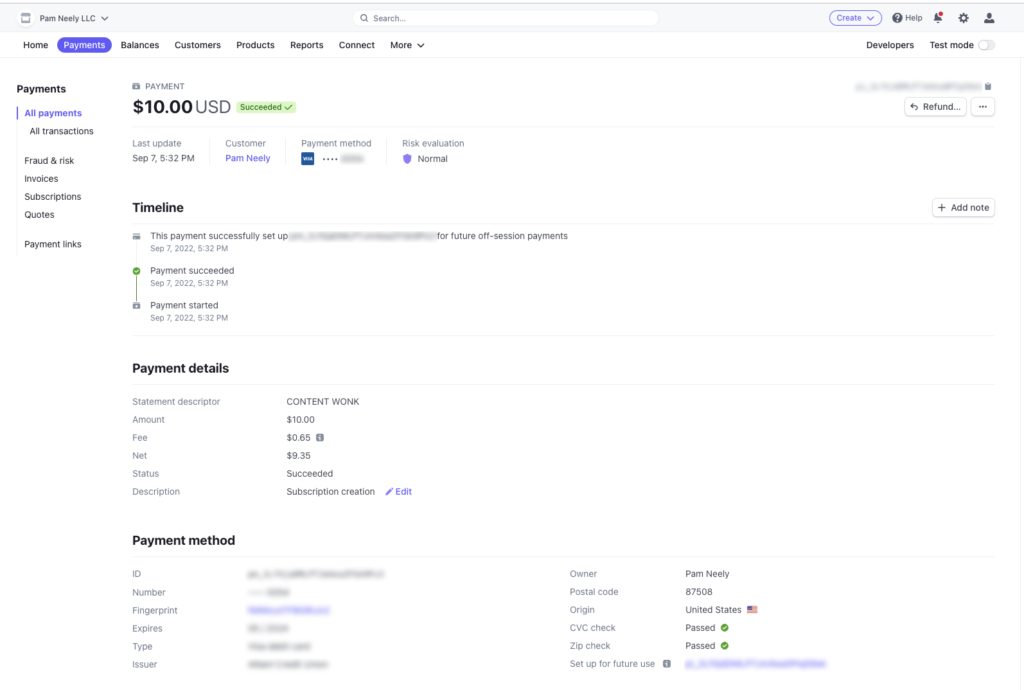
I have a working buy button! I’ll repeat the settings for the other button, of course.
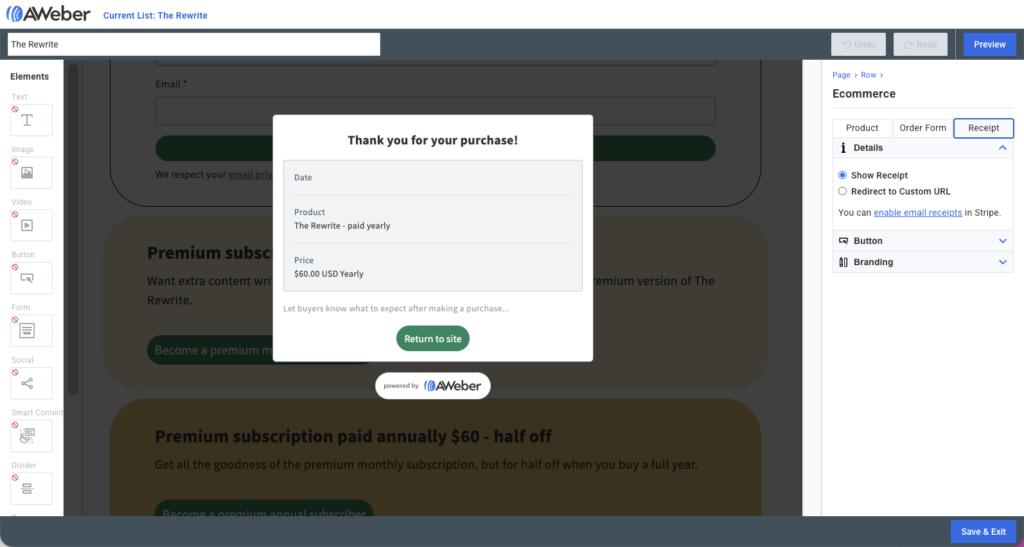
One thing I did notice in this video: I need to create a thank you page. I specify that by clicking on the buy button again and going to the “Receipt” tab. Then on I’ll change the radio button from “Show Receipt” to “Redirect to Custom URL.” That custom URL could be a page on my website, a link to any other page on the web, or another AWeber landing page.
So now I’m ready to send a test free newsletter and a test paid newsletter to myself.
We’re so close… stay with me for this last step.
Step 10: Send a test newsletter to your free and paid lists
There are a couple of things to do here.
- Send a test newsletter to my free and paid lists (using two dummy email addresses)
- Set up the list so that when a free subscriber buys the premium subscription, they stop getting the free version.
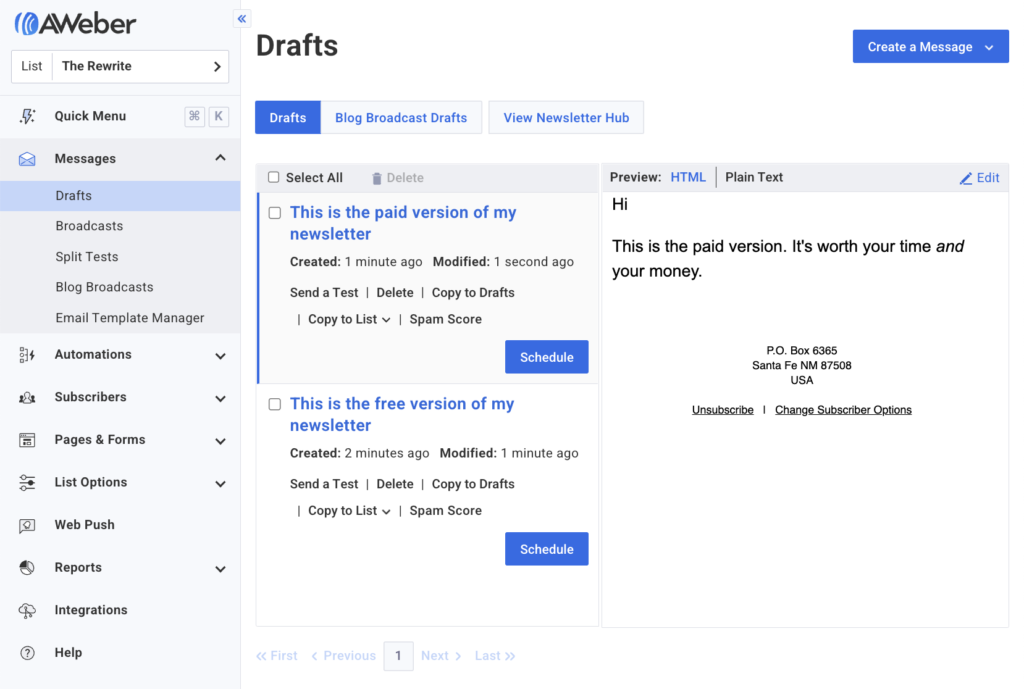
To send the tests, I’ve signed up for both the free and paid versions of my newsletter with different test email accounts. I’ve also created two very simple emails that are for each version of the newsletter.
I’m going to schedule each email to go out to the right “list.” To do that, I need to create a segment based on a tag. In other words, I’m going to set up a rule in my list that moves any subscriber with a specific tag into a segment of my list, so I can send emails to that group of people (that segment) easily.
There is a help page for how to do that here, but I’m also going to walk through how to do it.
First thing: I’ve already got my tags, “premium-monthly”, “premium-annual” and “free-subscribers”. I created those and added them to the appropriate subscribers back when I set up the sign-up forms for each version of the newsletter.
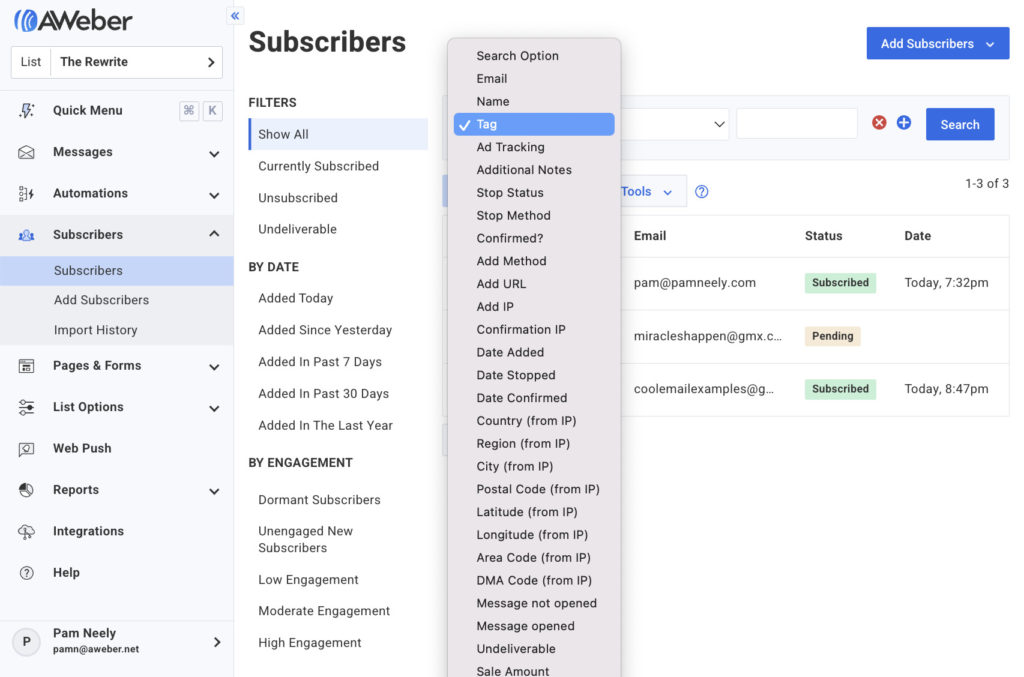
To create a segment from those tags, I’ll go into the “Subscribers” section of my account, then choose “Tag” from the search option pull-down menu.
Next I’ll choose “is any of these” from the next pull-down menu.
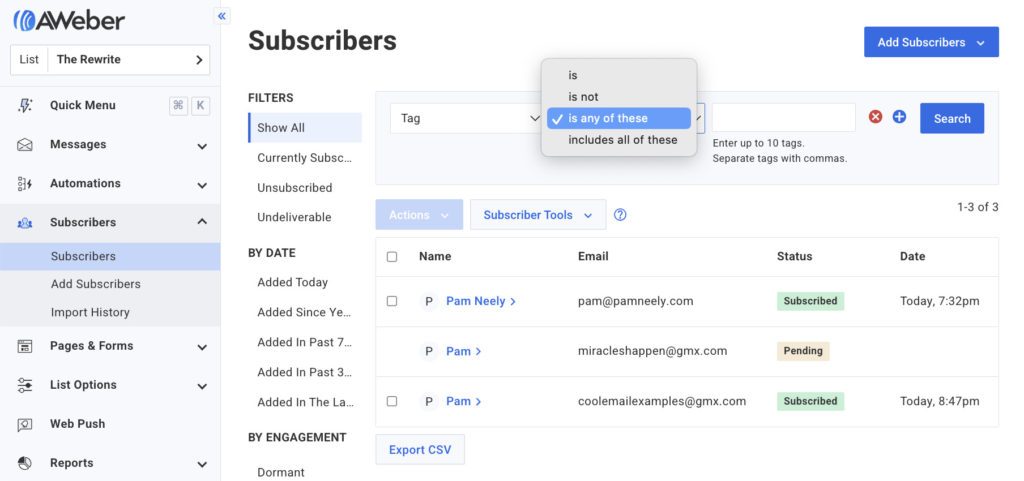
And finally I’ll enter the two tags in the third column, then click “Search.”
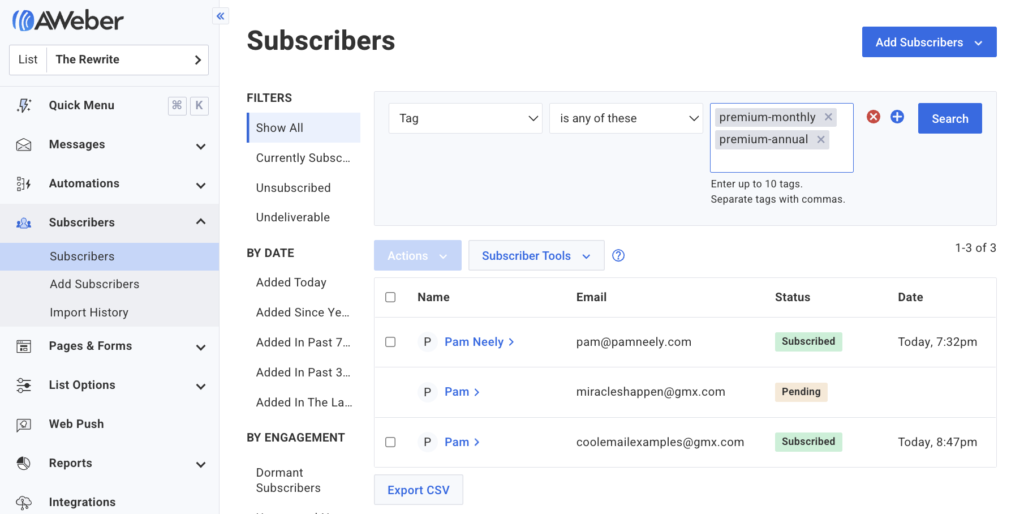
The results correctly show the one email address that is a premium subscriber.
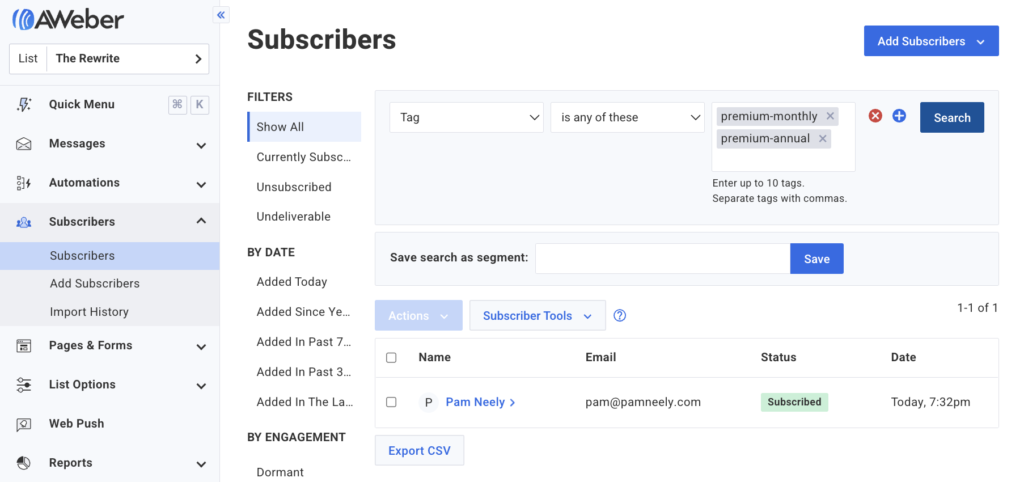
I can save this as a segment by adding a name to the “Save search as segment” field in the middle of the page (it’s just under the search parameters). I’ll name this segment “paid-subscribers”.
Now that I’ve got that segment, I can schedule a message to either go out to only a segment of my list (those paid subscribers).
I’m going to repeat this process with the tag “free-subscribers”. So when I’m done, I’ll have two segments: “paid-subscribers” and “free-subscribers”.
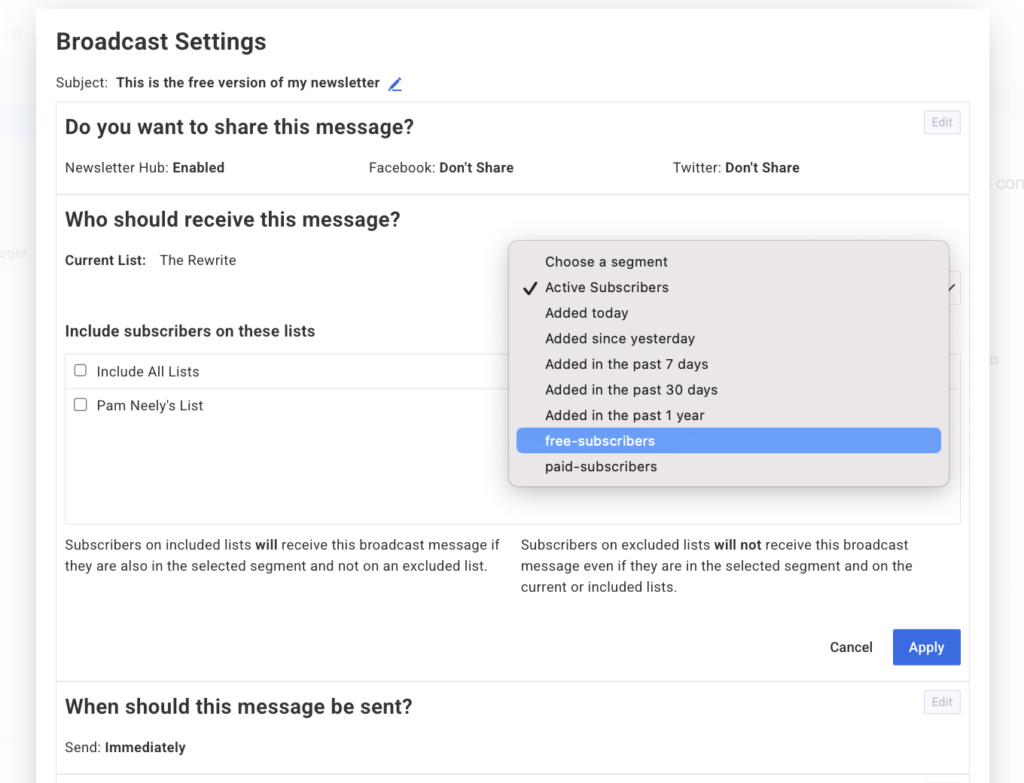
Now it’s time to send the test emails. I’ll go back to the “Messages” > “Drafts” section of my account, chose the email I want to send to free subscribers, and schedule the email to go out. That’s where the list settings for choosing which segment to send to are.
These are the settings I’ll use for free subscribers.
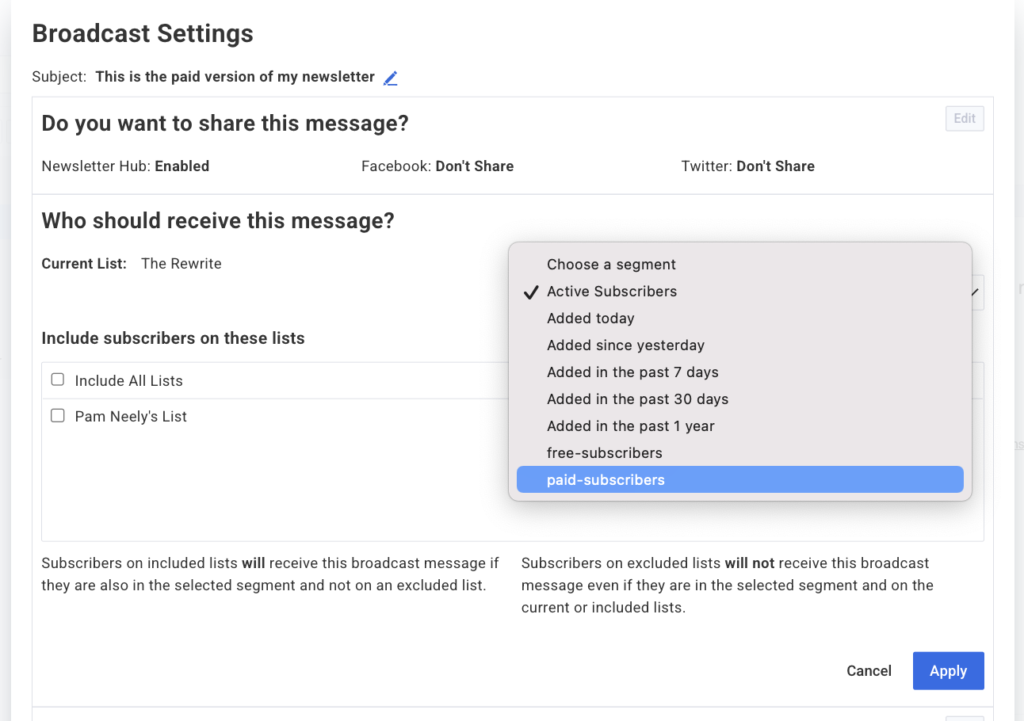
And the settings I’ll use for paid subscribers:
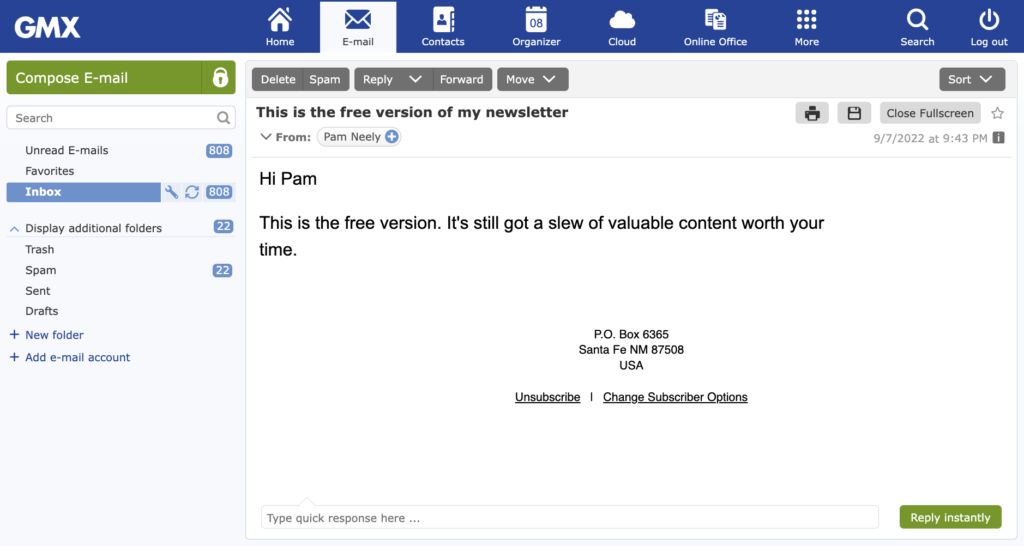
Sure enough… the free version of the newsletter went to the email address that’s subscribed to the free newsletter:
And the paid version of the newsletter went to the email address on the paid list:

Your turn: Create your own paid newsletter
It all worked. The landing page, the buy buttons, the automations, the list settings, and the test newsletters. All with a free AWeber account.
There were a lot of steps to this, but you made it to the end. There are more customizations I could do for my newsletter (like a welcome email, a customized Stripe receipt), but the newsletter works as is. I’ve got enough — and you’ve got enough — to start creating and sending the actual newsletters.
So what will you do with your new knowledge? What kind of newsletter will you start? We’d love to know. Leave a comment below and tell us.
Chuck Bartok
9/8/2022 3:28 pmAre we forced to use STRIP or is PayPal an option?
Pam Neely
9/8/2022 5:16 pmHi Chuck! No forcing at all – you can also use PayPal.
Fed
9/13/2022 4:43 pmThank you so much for this article 🙏
I already have a free Aweber account and a free newsletter can I use it for the paid one ?
If yes, can you tell please can I proceed?
Pam Neely
9/14/2022 12:41 pmWe’re so glad the post was helpful! If you have a free account with a newsletter on it already, you’ll need to follow:
– Step #3: Define the difference between your paid and free lists
– Step #4: Decide on the price of your paid newsletter
– Step #7: Create and connect your Stripe account with AWeber (you’ll also need to create two “products” in your Stripe account; one for the monthly payment for the paid version of your newsletter, one for the annual payment for the paid version of your paid newsletter.
– Step #8: Set up a landing page to charge for subscriptions
– Step #9: Connect the buy buttons to Stripe products and add the purchase automation tags
– Step #10: Send a test newsletter to your free and paid lists. This includes creating a segment of paid subscribers. You’ll create a segment based on the tag you add to people when they “buy” your newsletter. So, to be clear, you’ll have only one list for both the free and paid versions of your newsletter; you’ll just segment out your paid subscribers and send them the paid version of your newsletter.
If you have any more questions, please don’t hesitate to ask them! We’re excited to see how you use this.